Kubernetes tutorial
1. Kubernetes what?
Kubernetes (K8s) is an open-source system for automating deployment, scaling, and management of containerized applications.
Kubernetes minikube install @Mac
1 | sysctl -a | grep -E --color 'machdep.cpu.features|VMX' |
minikube version
1 | # /tmp/fluentd/etc [9:47:26] |
Kubernetes is growing rapidly, has become a leader in Container Orchestration。
2. Kubernetes why?
生产环境应用会包含多个 Containers,而这些 Containers 还很可能会跨越多个服务器主机部署。
- Kubernetes 提供了为那些工作负载大规模部署 Container 的编排与管理能力.
- Kubernetes 编排能构建多容器应用服务,在集群上调度或伸缩这些容器,及管理它们随时间变化的健康状态.
Kubernetes 也需要与网络、存储、安全、监控等其它服务集成才能提供综合性的容器基础设施。
有了 Kubernetes,你可以:
- 跨主机编排 Container;
- 控制与自动化应用的部署与升级。
- 为有状态的 Application 挂载和添加存储器。
- 线上扩展或裁剪 Containerized applications 与它们的资源。
- 声明式的容器管理,保证所部署的应用按照我们部署的方式运作。
- 通过自动布局、自动重启、自动复制、自动伸缩实现应用的状态检查与自我修复。
Kubernetes 依赖其它项目来提供完整的编排服务。结合其它必要开源项目作为其组件:
- 仓库:Atomic Registry、Docker Registry 等。
- 网络:OpenvSwitch 和智能边缘路由等。
- 监控:heapster、kibana、hawkular 和 elastic。
- 安全:LDAP、SELinux、 RBAC 与 支持多租户的 OAUTH。
- 自动化:通过 Ansible 的 playbook 进行集群的安装和生命周期管理。
- 服务:大量事先创建好的常用应用模板。
红帽 OpenShift 为容器部署预先集成了上面这些组件。
3. Kubernetes architecture
Kubernetes 支持在多种环境下的安装:
- 本地主机(Fedora)
- 云服务(Google GAE、AWS)
3.1 K8s architecture
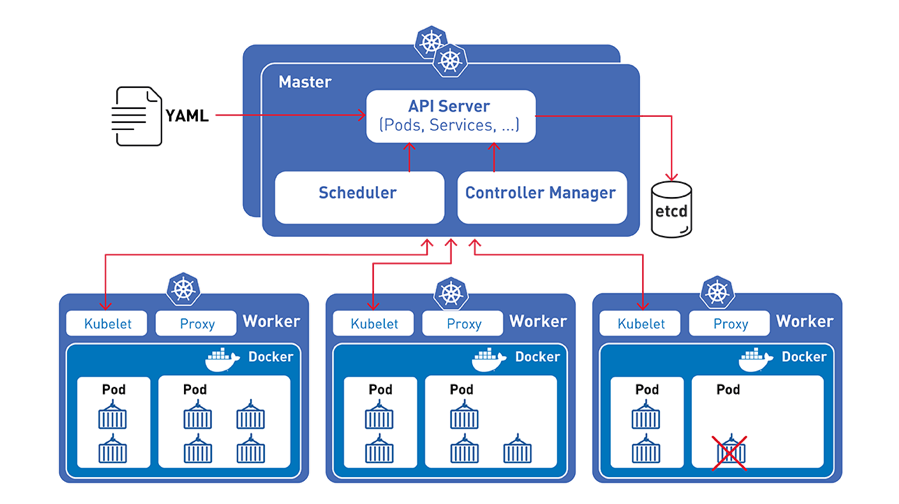
3.2 Master
Master有三个组件:API Server、Scheduler、Controller:
- API Server 是整个系统的对外接口,提供 RESTful 方式供客户端和其它组件调用;
- Scheduler 负责对资源进行调度,分配某个 pod 到某个节点上;
- Controller-manager 负责管理控制器,包括 endpoint-controller(刷新服务和 pod 的关联信息)和 replication-controller(维护某个 pod 的复制为配置的数值)。
3.3 Node
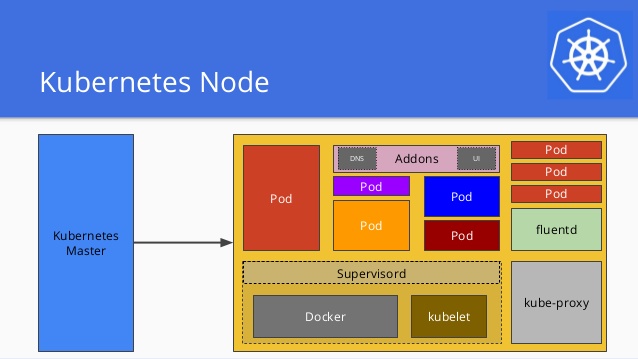
集群中的每个非 master 节点都运行两个进程:
- kubelet,和 master 节点进行通信。
- kube-proxy,一种网络代理,将 Kubernetes 的网络服务代理到每个节点上。
3.4 Kubernetes 术语
Master(主节点): 控制 Kubernetes 节点的机器,也是创建作业任务的地方。
Node(节点): 这些机器在 Kubernetes 主节点的控制下执行被分配的任务。
Pod: 由一个或多个容器构成的集合,作为一个整体被部署到一个单一节点。
同一个 pod 中的容器共享 IP 地址、进程间通讯(IPC)、主机名以及其它资源。
Pod 将底层容器的网络和存储抽象出来,使得集群内的容器迁移更为便捷。
- Replication controller: 控制一个 pod 在集群上运行的实例数量。
- Service: 将服务内容与具体的 pod 分离。Kubernetes 服务代理负责自动将服务请求分发到正确的 pod 处.
- Kubelet: 这个守护进程运行在各个工作节点上,负责获取容器列表,保证声明的容器已经启动且正常运行。
- kubectl: 这是 Kubernetes 的命令行配置工具。
4. Quickstart minikube
启动 Kubernetes cluster
4.1 Start Minik & create cluster
Start Minikube and create a cluster
1 | # /tmp/fluentd/etc [14:03:57] |
4.2 create a k8s Deployment
Let’s create a Kubernetes Deployment using an existing image named echoserver, which is a simple HTTP server and expose it on port 8080 using --port.
1 | ➜ kubectl create deployment hello-minikube --image=k8s.gcr.io/echoserver:1.10 |
4.3 hello-minikube Deployment
To access the hello-minikube Deployment, expose it as a Service:
1 | ➜ kubectl expose deployment hello-minikube --type=NodePort --port=8080 |
4.4 view hello-minikube Pod
The hello-minikube Pod is now launched but you have to wait until the Pod is up before accessing it via the exposed Service.
If the output shows the STATUS as Running, the Pod is now up and running:
1 | ➜ kubectl get pod |
kubectl get cmd:
1 | kubectl get node |
4.5 view the Service details
Get the URL of the exposed Service to view the Service details:
1 | ➜ minikube service hello-minikube --url |
Output:
1 | Hostname: hello-minikube-797f975945-nrb6r |
4.6 delete hello-minik service
1 | kubectl delete services hello-minikube |
4.7 delete hello-minik deploym
销毁该 Deployment(和它的 pod)
1 | kubectl delete deployment hello-minikube |
4.8 stop Minikube cluster
1 | minikube stop |
4.9 delete Minikube cluster
1 | minikube delete |
5. Kubernetes hexo
- 用 kubectl 命令直接创建,比如:
1 | kubectl run nginx-deployment --image=nginx:1.7.9 --replicas=2 |
- 通过配置文件和 kubectl apply 创建,要完成前面同样的工作,可执行命令:
1 | kubectl apply -f nginx.yml |
Kubernets 还提供了几个类似的命令,例如:
- kubectl create, kubectl replace
- kubectl edit, kubectl patch
5.1 kubectl cluster-info cmd
kubectl cluster-info
1 | ➜ kubectl cluster-info |
kubectl get po,svc -n kube-system
1 | ➜ kubectl get po,svc -n kube-system |
5.2 Create deployment hexo4
1 | kubectl run --image=blair101/ubuntu-hexo-blog:v1.4 hexo4 --port=4000 --env="DOMAIN=cluster" |
创建一个 deployment, name: hexo4, 也会生成一个 pod, 可通过 kubectl edit deploy hexo4 修改副本数为2
1 | ➜ kubectl get deploy,svc |
查看详细 deploy hexo4 -o yaml
1 | kubectl get deploy hexo4 -o yaml |
1 | apiVersion: apps/v1 |
一些常用命令记录:
1 | kubectl describe po hexo4-67f54d9bd9-ffnsp |
5.3 Create service hexo4
1 | kubectl expose deployment hexo4 --port=4000 --name=hexo4 |
查看 service, kubectl edit svc hexo4
1 | ➜ kubectl get deploy, po, svc |
查看 service hexo4 详情:
1 | ➜ kubectl get svc -o yaml hexo4 |
5.4 kubectl edit service hexo4
1 | kubectl edit service hexo4 |
type: ClusterIP --> NodePort 且 spec.ports 增加 nodePort: 30001
1 | spec: |
5.5 build hexo5, deploy ervice
create deployment hexo5
1 | kubectl run --image=blair101/ubuntu-hexo-blog:v1.5 hexo5 --port=4000 --env="DOMAIN=cluster" |
create service hexo5
1 | kubectl expose deployment hexo5 --port=4000 --name=hexo5 |
kubectl edit service hexo5
type: ClusterIP --> NodePort 且 spec.ports 增加 nodePort: 30001
5.6 modify service hexo4
更改 selector.run: hexo4 为 hexo5
1 | spec: |
接下来是一些 delete 操作.
Reference
- kubernetes.io
- Kubernetes with Minikube
- Install Minikube
- Github kubernetes
- Kubernetes 项目· Docker —— 从入门到实践 - yeasy
- 从0到1使用Kubernetes系列
- 知乎: Kubernetes 是什么?
- 郑建勋(jonson)K8S
- 官网 k8s 概念 & 对象
- Docker 用户使用 kubectl 命令指南
- Get a Shell to a Running Container
- Label, Deployment, Service 和 健康检查
Checking if Disqus is accessible...